Spec-Driven Development
In the near future, the person who communicates most effectively is the most valuable programmer. If you can communicate effectively, you can program.
Moving forward, the new scarce skill is writing specifications that fully capture the intent and values [of what you want to build]. Whoever masters that becomes the most valuable programmer. There’s a reasonable chance that this is going to be the coders of today. This is already very similar to what we do. However, product managers also write specifications…
Sean Grove, Engineer at OpenAI
The antidote for the “AI-slop” that may be generated from careless Vibe Coding is Spec-Driven Development.
Spec-Driven Development (SDD) is exactly what it sounds like: you write specifications before code. It’s a more structured and methodical approach than just typing or speaking a stream of conciousness, and then hoping for the best.
Specifications (specs) are documents for things like:
- Requirements - What should the system do? (user stories and acceptance criteria)
- Design - How will the system work? (architecture and data models)
- Tasks - What are the discrete implementation steps? (actionable checklist)
A traditional human written Product Requirements Document (PRD) is a type of spec whose audience was engineers and other colleagues. The purpose of the PRD was to achieve alignment between product, design, and engineering on what should be built.
AI-native specs serve the same goal but the primary audience for these documents is an AI agent rather than a colleague. Fortunately, the documents retain the benefit of being human readable in the form of markdown text (.md) files.
AI-native specs are written by AI with a human-in-the-loop. Your job is to prompt AI for an initial spec document and refine it through direct updates or further prompting.
Like a traditional PRD, this collection of documents serves as the blueprint and architectural drawing of the product.
Once you have high-quality specs, AI agents can begin building what you’ve described, translating your intent into a high-fidelity implementation.
Before we dive deeper into creating specs, we need a solid understanding of product architecture so we know what we are actually specifying. When you write requirements and design documents for web or mobile applications, you’ll be working with several fundamental frontend and backend building blocks: client, server, apis, and database.
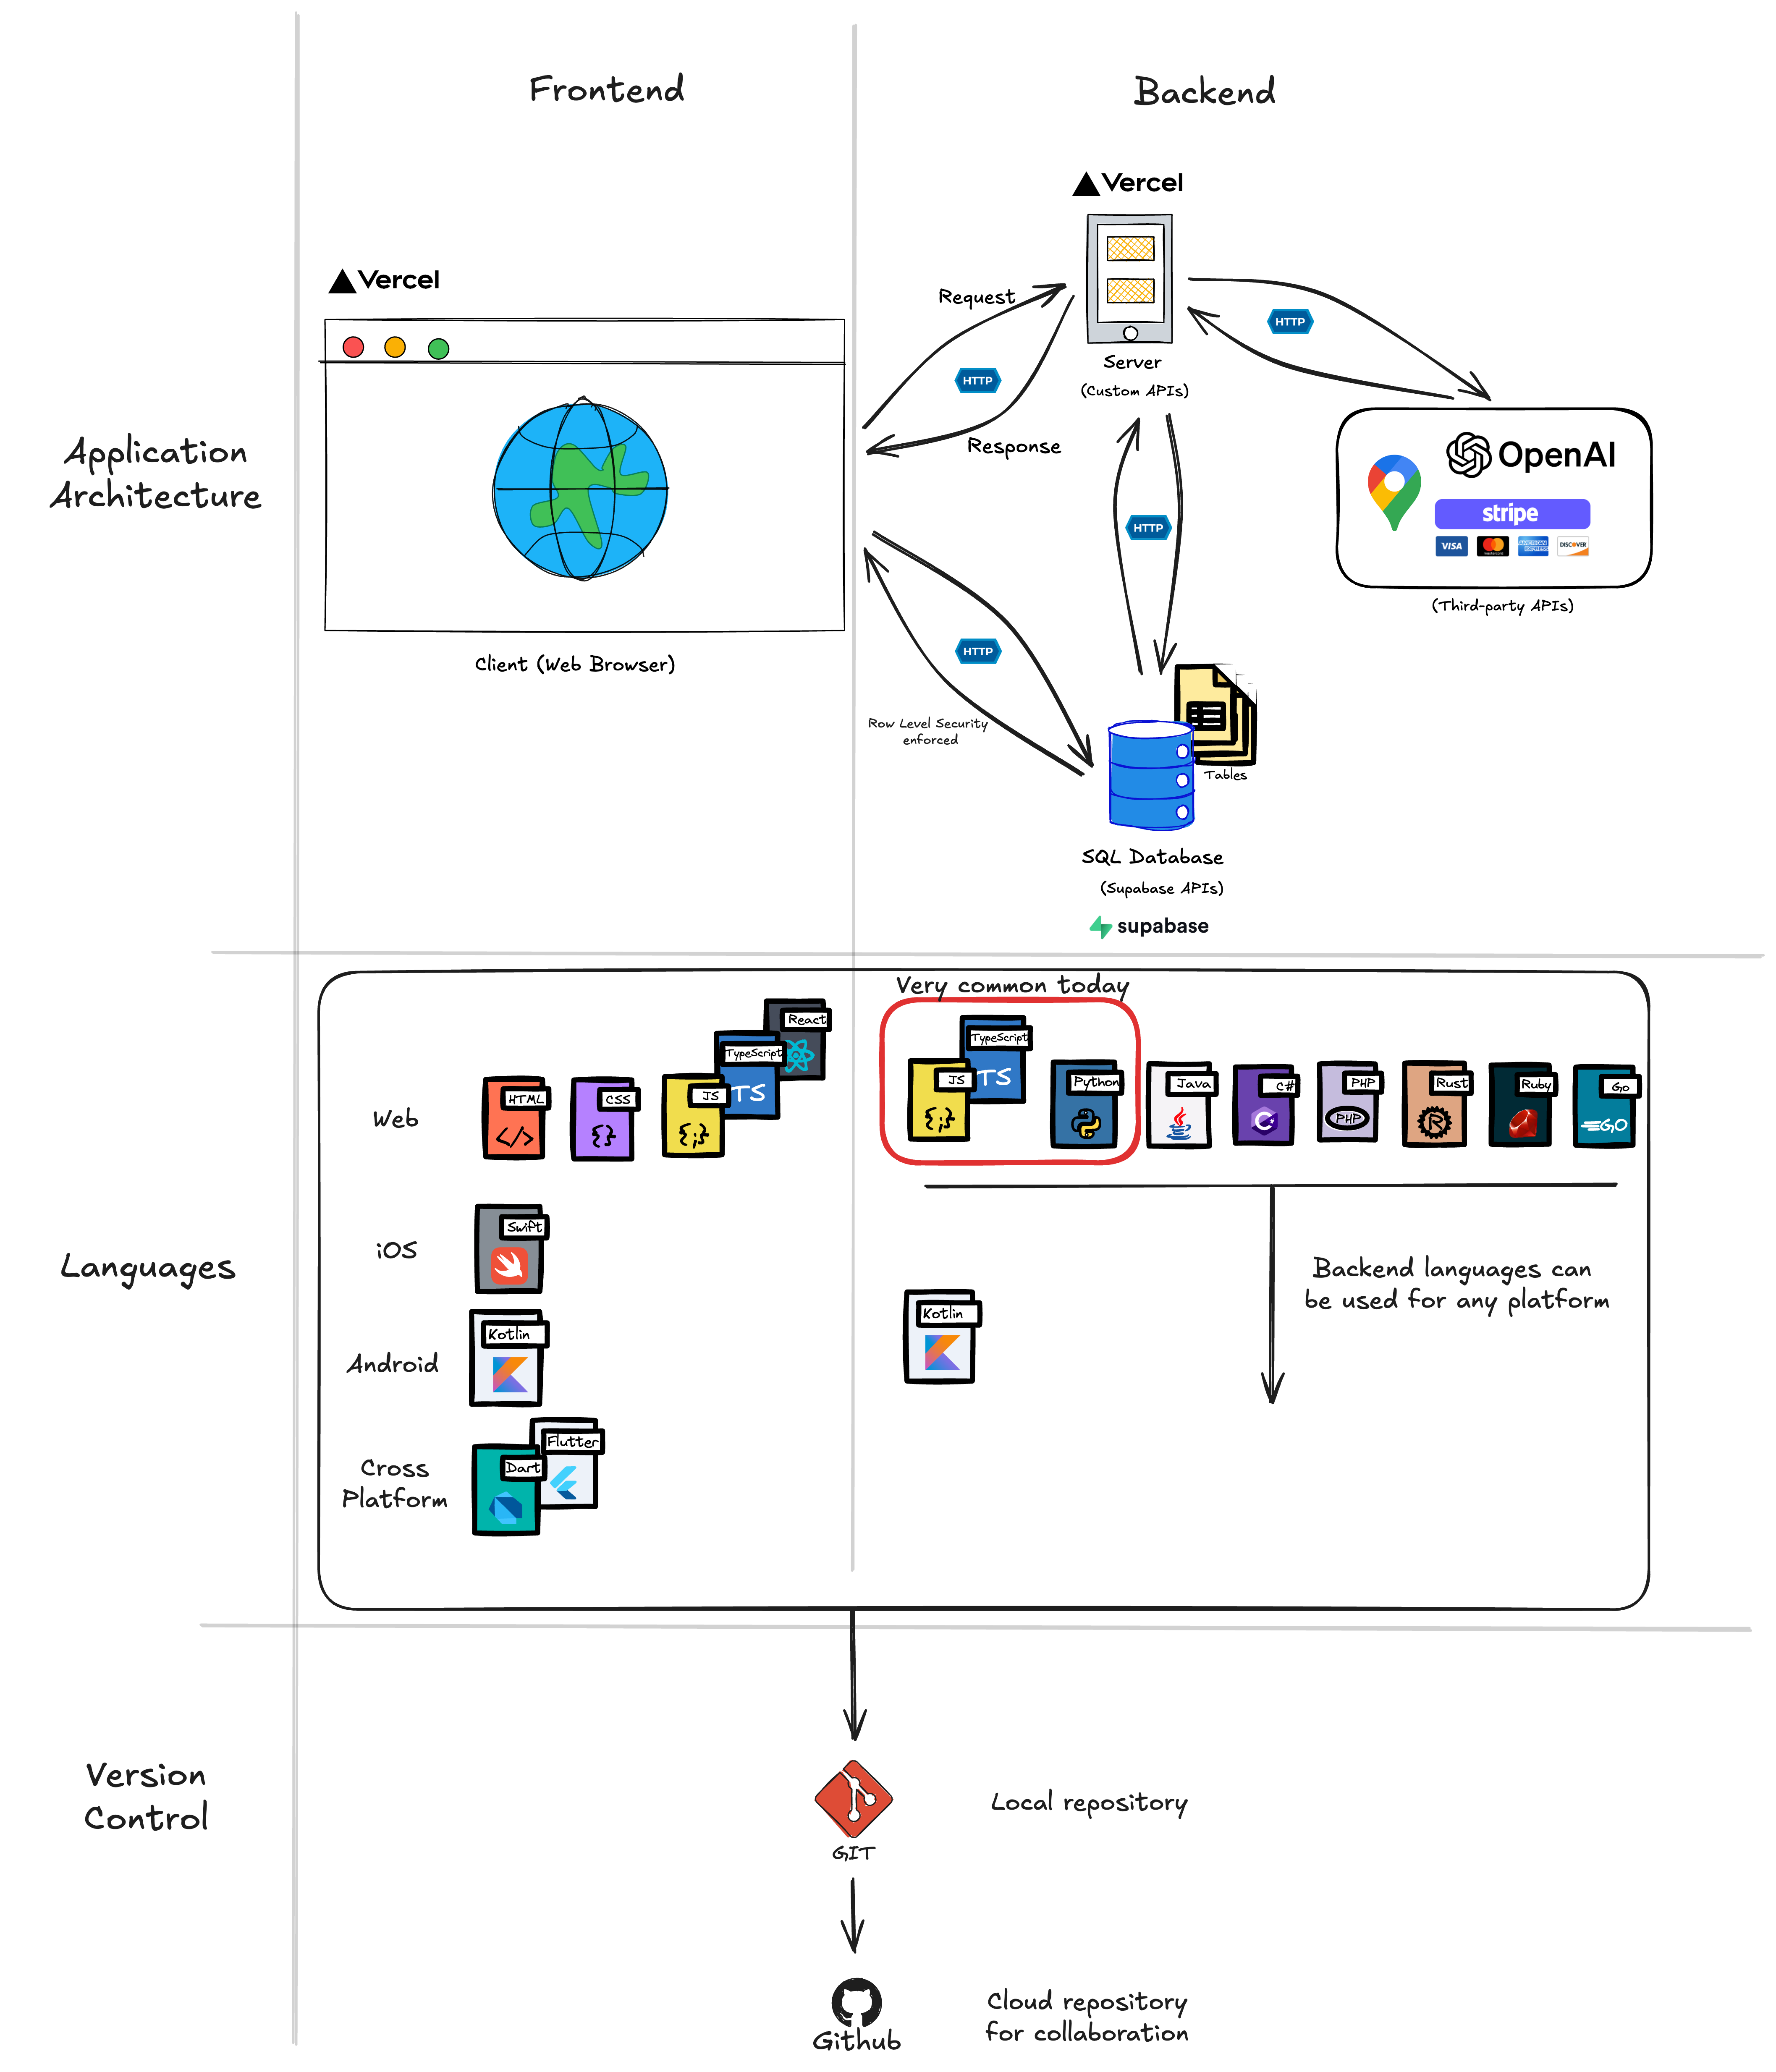
Frontend (The User Interface)
The frontend is everything users see and interact with, whether in a browser or on a smartphone. It’s the buttons, forms, text, images, and animations. When you click “Add to Cart” on a shopping site, that button and the visual feedback you get, that’s frontend.
The frontend (web browser or mobile app) is sometimes called the “client”. Hoever “client” can also mean any consumer of an API, for example a server-side job, a third-party service, or another backend that calls your API. When we say “client-side” or refer explicitly to the frontend, we mean code executing in the user’s browser or device; when we discuss API interactions, “client” may refer to any caller of the API.
Technologies you’ll encounter:
Web:
- HTML/CSS/JavaScript - Structure, styling, and interactivity
- Frameworks - React, Vue, Svelte (for complex interfaces)
Mobile:
- Native - Swift (iOS), Kotlin (Android) for platform-specific apps
- Cross-platform - React Native, Flutter (one codebase for both iOS and Android)
Backend (The Business Logic)
The backend consists of everything the user does not directly see. It handles the “business logic” which are the rules and operations that make your app work. When you submit a login form, the backend checks if your password is correct. When you add a to-do item, the backend validates it and saves it.
Technologies you’ll encounter:
- Server frameworks - Node.js/Express, Python/Django, Ruby on Rails
- APIs - The connection points between frontend and backend (more on this below)
- Backend Services - Firebase, Supabase, AWS Amplify (backend-as-a-service for mobile apps)
- Authentication - Login systems, user sessions, permissions
Database (The Memory)
The database is where your application stores data permanently. Think of it as your app’s long-term memory. Whether users access from a browser or mobile device, the database ensures their data persists.
Technologies you’ll encounter:
- SQL databases - PostgreSQL, MySQL (data organized like spreadsheets with tables and rows)
- NoSQL databases - MongoDB, Firebase Firestore (organized like nested documents)
- Mobile-friendly options - Firebase, Supabase (real-time sync across devices)
- Local storage - SQLite (on-device storage for mobile apps), IndexedDB (browser storage)
For example, in a to-do list app, items are stored in a SQL database table that might look like:
| id | user_id | task_text | completed | created_at |
|---|---|---|---|---|
| 1 | 42 | “Buy groceries” | false | 2025-01-15 10:30:00 |
| 2 | 42 | “Call dentist” | true | 2025-01-15 11:45:00 |
API (The Messenger)
API stands for Application Programming Interface which is unfortuate because it doesn’t describe very clearly what an API does. An API is the messenger system carries information between the frontend and backend. If you need to display data onscreen (your frontend) then an API provides the rails to retreive this data from the database.
Examples When you add a to-do item:
- Frontend sends a POST request to
/api/taskswith the task text - Backend receives the request, validates the data, saves to database
- Backend sends response back:
{ success: true, task: { id: 123, text: "Buy groceries" } } - Frontend receives response and updates the UI
How They Work Together: The Full Stack
Here’s how all four pieces work together when a user adds a to-do item (same flow for web and mobile):
This is called the “full stack”: frontend (web/mobile), backend, database, and the APIs connecting them. When you become a Full-Stack Product Builder, you’re able to specify requirements and design across all these layers for both web and mobile platforms.
Why This Matters for Writing Specs
When you write specifications, you’ll need to think about all these layers:
Bad spec (vague):
The app should let users create accountsGood spec (covers all layers):
## User Registration Feature

### Requirements
WHEN user submits registration form with valid email and password
THEN system SHALL create account and send confirmation email

### Design

**Frontend (Web & Mobile):**
- Registration form with email and password fields
- Client-side validation: email format, password minimum 8 characters
- Display loading state during submission
- Web: /signup route | Mobile: RegisterScreen component

**API:**
- POST /api/auth/register
- Request: { email, password }
- Response: { success, user } or { success: false, error }

**Backend:**
- Validate email format and uniqueness
- Hash password using bcrypt
- Create user record
- Send confirmation email via SendGrid
- Return JWT token for authentication

**Database:**
- Users table with: id, email (unique), password_hash, created_at
See the difference? The good spec thinks through the entire stack for both web and mobile. This is what Claude Code (or any AI coding agent) needs to generate quality code.
Don’t Panic
This might feel like a lot if you’re new to technical concepts. The good news: you can learn super fast. You just need enough understanding to start knowing what questions to ask.
The core You’ll start naturally thinking: “This feature needs a frontend form, an API endpoint to submit it, backend validation, and a database table to store the results.”
And here’s the best part: Claude Code can help you learn. When you’re unsure about how something should work technically, you can ask:
I want to add user authentication to my app. Can you explain what
database tables I'll need and what the API endpoints should look like?
The AI will explain the architecture and help you write the specs. You’re not expected to know everything, you’re expected to ask good questions and guide the implementation.
The SDD Workflow
Most SDD approaches follow a similar pattern:
Instead of asking the AI to “build the entire authentication system,” you:
- Write down what authentication needs to do (requirements)
- Design how it will work technically (design)
- Break it into small tasks (tasks)
- Have AI implement one task at a time (implementation)
- Test and iterate
The goal is to guide the AI through small, controlled changes instead of letting it improvise an entire feature.
Major SDD Approaches
Several platforms have emerged with structured approaches to SDD. Let’s look at the main ones:
Kiro’s Three-File System
Kiro has built a platform around three core specification files. Their approach is clean and straightforward:
requirements.md uses EARS format (Easy Approach to Requirements Syntax):
WHEN [trigger/condition]
THE SYSTEM SHALL [expected behavior]
This format makes requirements testable and unambiguous. For example:
WHEN a user submits login form with valid credentials
THE SYSTEM SHALL redirect to dashboard within 2 seconds

WHEN a user submits login form with invalid credentials
THE SYSTEM SHALL display error message "Invalid username or password"
AND not reveal which field was incorrect
No room for interpretation. Either it does this or it doesn’t.
design.md documents the technical blueprint:
- System architecture and components
- Data models and relationships
- API endpoints and interfaces
- Error handling strategies
- Sequence diagrams showing how things interact
tasks.md breaks implementation into trackable work items:
- [ ] 1. Set up authentication middleware
  - Install passport.js and dependencies
  - Configure session management
  - Requirements: 1.1, 1.2

- [ ] 2. Create login form component
  - Build form with email and password fields
  - Add client-side validation
  - Requirements: 2.1
Each task is small enough to implement and test independently.
Kiro’s philosophy is that these three documents become your “bridge between product vision and technical execution.” When product and engineering are speaking from the same specifications, miscommunication drops dramatically.
GitHub Copilot Spec-Kit
GitHub recently released Spec Kit as an open-source toolkit for SDD.
GitHub’s Spec-Kit uses three main slash commands to guide development:
/specify- Define what the feature should do (no technical decisions yet)/plan- Choose technical approach (frameworks, architecture, database design)/tasks- Break plan into implementable chunks for AI agents
These commands integrate directly into whatever IDE/AI Agent you are using so you never leave your editor.
The constitution.md file is also unique to Spec-Kit. It establishes non-negotiable project principles:
# Project Constitution

## Security Non-Negotiables
- All user data encrypted at rest and in transit
- No credentials in environment variables or config files
- All API calls require authentication tokens

## Performance Standards
- API responses < 200ms for 95th percentile
- Page load time < 2 seconds
- Database queries use connection pooling

## Code Quality Rules
- Test coverage stays above 80%
- All functions have JSDoc comments
- No TODO comments in main branch
Think of it as your project’s foundational rulebook. When the AI suggests an approach that violates the constitution, you can point back and say “no, we established this principle upfront.”
You can install GitHub Spec-Kit by running this command in the terminal or asking Claude Code to run it for you. You may need to install dependecies which Claude Code can guide you through if needed.
uv tool install specify-cli --from git+https://github.com/github/spec-kit.gitThen open the folder within VS code that you want to work from and run the following command.
specify init . --ai claudeWhen presented with the options to choose your script type select sh if using a Mac or ps if using Windows.
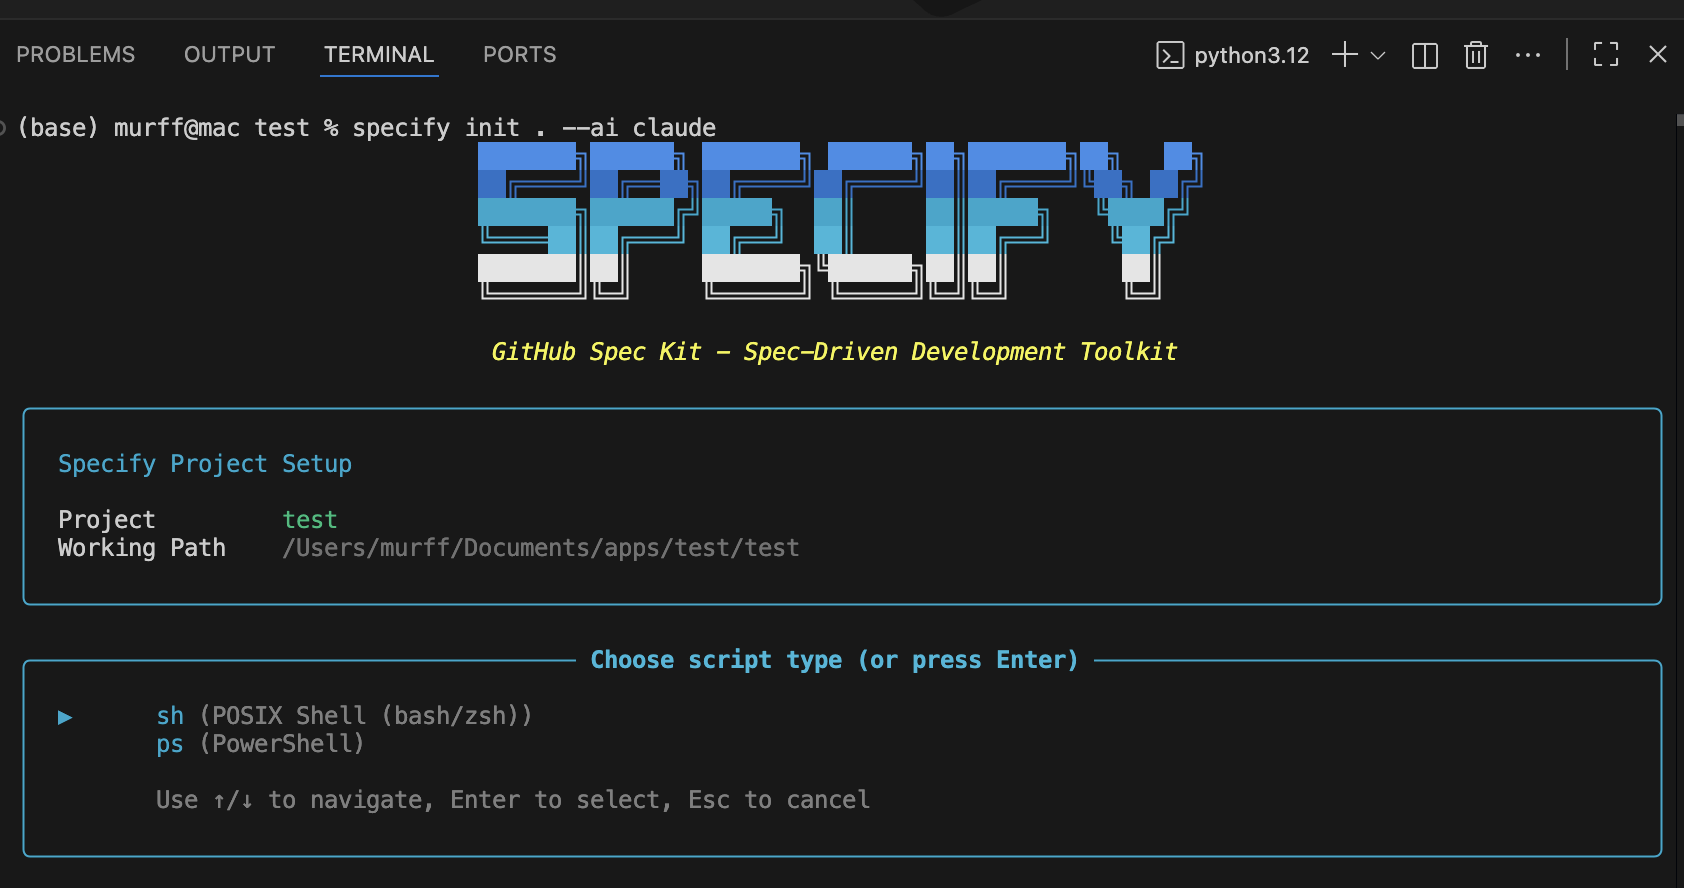
Now Spec-Kit is set up. Start up Claude and you will have several new slash commands available to you. You will also see a new folder appear titled .specify.
Claude Code’s Planning Mode
While GitHub’s Spec-Kit can be added to it, Claude Code has a native Planning Mode built directly into the agent that functions somewhat like SDD out of the box.
Planning Mode is a read-only exploration environment. When you enable it, Claude Code can:
- Research your existing codebase without making changes
- Ask “what if” questions and explore alternatives
- Load relevant context into its memory
- Build understanding of how your system works
- Draft specifications based on what it learns
The key advantage: zero risk of accidental changes during the planning phase.
Here’s how a typical workflow looks:
- Enter Planning Mode - Tell Claude “let’s plan a new feature for user profiles”
- Research phase - Claude explores your codebase, asks clarifying questions, identifies patterns
- Draft specs - Claude creates requirements.md, design.md, and tasks.md
- Review together - You review the specs, suggest changes, iterate
- Exit Planning Mode - Once specs are approved, exit and begin implementation
- Execute tasks - Ask Claude to implement one task at a time from tasks.md
The separation between planning and execution is powerful. You can think through everything thoroughly without the pressure of “is this going to break my working code?”
Many developers configure their CLAUDE.md file to enforce consistent SDD workflows. For example, you can set rules like “always read requirements.md, design.md, and tasks.md before implementing any task” or “mark tasks complete by changing [ ] to [x] in tasks.md.”
Going farther, you can implment Kiro’s approach directly into Claude Code as described here.
In October 2025 Cursor added a plan mode that is simliar to Claude Codes.
Why SDD Matters (Especially for PMs)
If you’re a PM building prototypes or even production features with AI, SDD gives you superpowers:
1. Your code becomes maintainable
When you return to a project weeks later, the specs remind you why things were built that way. No more “what was I thinking?” moments.
2. You can collaborate effectively
Other team members (or your future self) can read the specs and understand the system without deciphering code. Design reviews happen at the spec level, before expensive rewrites.
3. You catch problems early
Writing requirements forces you to think through edge cases. “What happens if the user submits an empty form?” “What if the API is down?” Address these in specs, not after deployment.
4. AI generates better code
When the AI has clear specifications, it produces code aligned with your actual intent. Less improvisation, fewer surprises.
5. You build the right thing
Spec-driven development creates traceability. Every line of code traces back to a specific requirement. During testing, you can verify “does this actually do what we said it should do?”
Getting Started: Your First SDD Feature
Let’s walk through building a sophisticated task management feature on top of the simple to-do list from the vibe coding chapter. We’ll use prompts to have Claude Code create our specification documents and implement the feature step-by-step.
Step 1: Generate Requirements Document
Open Claude Code and use this prompt:
I want to build an advanced task management system that extends
a basic to-do list with projects, tags, priorities, and due dates.

Please create a requirements.md file in .claude/specs/advanced-task-management/
that includes:
- User stories for a PM managing complex workflows
- EARS format acceptance criteria (WHEN/THEN/SHALL)
- Requirements for: task organization, project management, tag system,
  filtering/sorting, and completion tracking
Claude will generate a requirements document with specific, testable criteria. Review it and iterate until you’re satisfied. The requirements should be unambiguous - no room for interpretation.
Step 2: Generate Design Document with Architecture Diagram
Once requirements are approved, use this prompt:
Now create a design.md file in .claude/specs/advanced-task-management/
based on the requirements.

Include:
- ASCII architecture diagram showing component hierarchy and data flow
- Data models (TypeScript interfaces for Task, Project, Tag)
- Storage structure using JSON files (we'll use JSON for simplicity,
  not a database)
- UI component specifications with specific behaviors
- Validation rules
- Error handling strategies

Important: Use JSON file storage (data/app-data.json) rather than
a database for this learning project.
The ASCII diagram will make the architecture crystal clear. Claude will show you exactly how components connect and where data lives.
Step 3: Generate Implementation Tasks
With design approved, generate the task breakdown:
Create tasks.md in .claude/specs/advanced-task-management/ that breaks
the design into implementation tasks.

Requirements:
- Numbered checkbox format (- [ ] 1. Task name)
- Maximum two hierarchy levels (1, 1.1, 1.2, 2, 2.1)
- Each task involves writing, modifying, or testing code
- Reference specific requirements from requirements.md
- Tasks should be completable in 15-30 minutes each
- Start with data models and storage, then state management,
  then UI components
You’ll get a concrete, step-by-step implementation plan.
Step 4: Implement Tasks One at a Time
Now implement each task individually. For each task, use this prompt pattern:
Please implement task 1: Set up project structure and data models.

Requirements:
- Reference .claude/specs/advanced-task-management/requirements.md
- Reference .claude/specs/advanced-task-management/design.md
- Add thorough code documentation:
  - JSDoc comments for all functions explaining purpose, parameters,
    and return values
  - Inline comments for complex logic
  - Type annotations for all TypeScript code
- Follow the exact data models from design.md

After implementation, mark task 1 as complete in tasks.md.Important: Only implement ONE task per prompt. After Claude completes the task, review the code, test it, then move to the next task.
For subsequent tasks:
Please implement task 2: Build storage layer utilities.

Requirements:
- Reference .claude/specs/advanced-task-management/requirements.md
- Reference .claude/specs/advanced-task-management/design.md
- Add thorough code documentation (JSDoc + inline comments)
- Implement error handling as specified in design.md
- Write code that matches the Storage Layer API from design.md

After implementation, mark task 2 as complete in tasks.md.
Step 5: Generate Architecture Explanation
After completing all implementation tasks, use this prompt to create documentation:
Please create an ASCII architecture diagram and explanation document
for the advanced task management system we just built.

The document should:
1. Show the complete system architecture in ASCII format
2. Explain to a non-technical person how the system works using:
   - Precise technical terms
   - Simple, concise definitions of any jargon
   - Clear description of data flow
   - Example of what happens when a user creates a task

Save this as .claude/specs/advanced-task-management/architecture-explained.md
This creates a bridge document that helps non-technical stakeholders understand what you built without getting lost in code.
Example Output
After running these prompts, you’ll have a complete, documented feature implementation. The final explanation might look like:
The system uses a "three-layer architecture":

1. UI Layer (Components): What the user sees and clicks
   - TaskList: Shows your tasks in a list
   - TaskForm: The form where you create new tasks

2. State Layer (Zustand Store): Manages data in memory while app is running
   - Holds current list of tasks, projects, and tags
   - Updates when you add/complete tasks

3. Storage Layer (JSON Files): Saves data permanently to disk
   - Reads from data/app-data.json when app starts
   - Writes to data/app-data.json when anything changes

When you create a task:
1. You fill out TaskForm and click "Create"
2. TaskForm calls store.addTask()
3. Store adds task to memory and calls storage.saveData()
4. Storage writes the updated task list to JSON file
5. TaskList re-renders to show your new task
This workflow ensures you build features systematically with complete documentation that both engineers and non-technical stakeholders can understand.
PRD Building Blocks for SDD
If you’re coming from a traditional PM background, you’re familiar with Product Requirements Documents (PRDs). SDD specs are similar but optimized for AI consumption.
Essential sections:
- Problem Statement - What problem does this solve?
- User Stories - Who benefits and how?
- Functional Requirements - What must the system do? (use EARS format)
- Non-Functional Requirements - Performance, security, accessibility standards
- Success Metrics - How will you measure if it works?
- Out of Scope - What are you explicitly NOT building?
Keep them scannable:
AI agents work best with structured documents. Use:
- Bullet points over paragraphs
- Code blocks for technical details
- Tables for comparisons
- Mermaid diagrams for visual clarity
Make them executable:
Use formats AI can parse (Markdown, YAML). Structure requirements consistently so AI agents can reference them programmatically:
Requirement 2.1: Form Validation
WHEN user submits form THEN system SHALL...
Then in your task: _Requirements: 2.1_
This creates traceability from code back to requirements.
CLAUDE.md: Your SDD Configuration
You can configure Claude Code to automatically follow your SDD workflow by adding instructions to your project’s CLAUDE.md file or your global ~/.claude/CLAUDE.md.
Here’s a starter template:
# Spec-Driven Development Workflow

## File Structure
All specs are stored in `.claude/specs/{feature-name}/`
- requirements.md
- design.md
- tasks.md

## Workflow Rules

### Planning Phase
1. Always create requirements.md first
2. Use EARS format: WHEN [trigger] THEN system SHALL [behavior]
3. Get explicit approval before proceeding to design

### Design Phase
4. Read requirements.md before writing design
5. Include data models, API specs, and error handling
6. Get explicit approval before creating tasks

### Implementation Phase
7. Read ALL spec files before implementing any task
8. Implement ONE task at a time
9. Mark tasks complete: [ ] → [x]
10. Wait for approval before proceeding to next task

## Quality Standards
- All functions require JSDoc comments
- Test coverage must be ≥ 80%
- No console.log statements in production code
- All user inputs must be validated server-side
With this in place, Claude Code will automatically follow your preferred SDD process across all features.
SDD in Practice: Tips and Gotchas
Start small
Don’t try to spec your entire app at once. Pick one feature. Follow the Requirements → Design → Tasks workflow. Experience the benefits. Then expand to more features.
Specs are living documents
You’ll discover things during implementation that weren’t obvious during planning. That’s fine. Update the specs. The goal isn’t perfect foresight - it’s maintaining a single source of truth.
Don’t over-specify
You’re not writing a legal contract. If the implementation detail doesn’t matter, don’t specify it. Give the AI room to use best practices.
Use AI to write specs
It’s perfectly fine to ask Claude Code to help you write specifications:
I need to add a password reset feature. Can you help me draft
requirements.md using EARS format? The feature should let users
request a reset link via email, then set a new password.
Then you review and refine.
Pair SDD with code review
Have another person (or Claude in a fresh session) review your specs before implementation. Catching design flaws in specs is 10x cheaper than in code.
When to Use SDD vs. Pure Vibe Coding
Use pure vibe coding for: - Quick throwaway prototypes - Exploring ideas (“what would this look like?”) - One-off scripts and automations - Learning new technologies
Use spec-driven development for: - Features that will be maintained - Code that multiple people touch - Anything going to production - Complex logic with edge cases - When you’ll need to come back later
In practice, you’ll often start with vibe coding to explore, then transition to SDD once you know what you want to build.
Exercise: Add a Feature Using SDD
Let’s practice. Take the to-do list app you built in chapter 1 (or any project you’re working on).
Your task: Add a new feature using spec-driven development.
Pick something relatively simple: - Add categories/tags to to-do items - Add due dates and reminders - Add a search/filter function - Add user authentication
Follow the workflow:
- Create requirements.md
- Write 3-5 user stories
- Write EARS-format acceptance criteria for each
- Think through edge cases
- Create design.md
- Document data model changes needed
- Specify any new API endpoints
- Describe the UI changes
- Include error handling approach
- Create tasks.md
- Break implementation into 5-10 small tasks
- Each task should take 10-30 minutes
- Reference specific requirements in each task
- Implement with Claude Code
- Ask Claude to implement task 1
- Review the code
- Mark task complete
- Move to task 2
Observe the difference:
How does this feel compared to pure vibe coding? Is the code quality better? Do you feel more in control? Can you explain why the code looks the way it does?